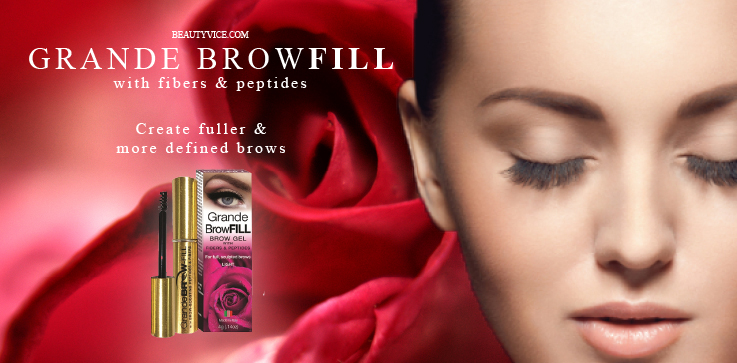
Grande Lash MD is one of the leading eyelash and eyebrow enhancing brands on the market. Their products deliver true results, without the use of hazardous chemicals that may affect your eyes or cause irritation. One of their best selling products is the Grande BrowFill with Fibers & Peptides. This easy to use brow grooming and filling tool makes getting bold and beautiful brows easy as can be.
Grande BrowFill with Fibers & Peptides helps to fill in your brows for a fuller look, groom them so they look in place and add color. This product comes in two colors, light and dark. Light is perfect for those with blonde to light brown hair. The dark shade is best for those with dark brown to black hair.
This specialized formula in Grande BrowFill with Fibers & Peptides is enhanced with peptides to enhance hair density and fibers that create a thicker brow immediately. All you have to do use swipe the wand in the direction your brows grow and your brows will look amazing. The formula also contains a specialized gel texture that helps to keep your brows in place all day long. The formula is easy to wash off and simple to clean up if you happen to apply too much. If you want to clean it up a little, just grab a q-tip and clean the area of concern.
Grande BrowFill with Fibers & Peptides is a great option for those that want to add thickness and color to their brows. Think of it as mascara for your brows. Used long with Grande Lash Brow Serum, your brows will be naturally full and beautiful before you know it. As we all know, brows are a big deal. The days of over plucking and thin brows are long gone. This has left many at a loss as over plucking and over waxing has thinned out their brows over time. Grande Lash products promise to help you rebuild your brows gradually and naturally without any irritation. These products work and give you beautiful results that will surely be noticed.
Have you ever thought about Keratin for your hair? If your hair is thick, frizzy, unmanageable, damaged or dull it is certainly a great option. Most believe Keratin Treatments are used to straighten hair. This is actually not true. Keratin Treatments do not straighten your hair, keratin is not a relaxing agent it is a smoothing agent. Keratin helps protect, seal and make your hair more manageable. Your hair maintains its natural texture, it simply becomes easier to style, maintain and healthier all around.
Hair is natural made of keratin bonds. These bonds help to keep your hair from breaking, becoming frizzy or dull. Over time as we color treat, chemically treat, heat style, expose our hair to sun and simply mistreat our hair; these keratin bonds start to break. The result is split ends, frizzy hair, dry hair, dull hair and overall unmanageable hair.
Keratin treatments help to restore keratin bonds by sealing the hair with natural keratin, creating healthier hair that is less likely to be damaged. Applying keratin at home can be easy if you have a little help and understand how to apply it properly. We do suggest you have help, as it may be hard to properly apply the keratin and flat iron the hair towards the back.
The first step towards successful application is to prep your hair with a clarifying shampoo. Clarifying shampoos deeply cleanse the hair and help to open up the hair shaft. You want the hair shaft open so that the keratin is readily absorbed and can fill in gaps caused by damage. There are various keratin hair products available, such as shampoos, conditioners, and flat irons. These products are great because they help to make the process easier. A good keratin clarifying shampoo helps to prep your hair with one or two washes max.
After washing your hair with the clarifying shampoo, towel dry your hair. Do not apply conditioner. You want your hair as clean as possible. When towel drying your hair dry it at least 80%. You can also sit under a drier for a few minutes to help your hair get 80% dry. This means your hair is still damp, but not soaking wet. If your hair is too wet or too dry, it will not allow the smoothing treatment to be absorbed well. These first few steps are very important as they set the groundwork for the application of the keratin treatment.
Once your hair is 80% dry, you can start applying your at home keratin treatment. Prep the solution by pouring just the needed amount into a bowl as you are drying you hair. Remember that once the solution is exposed to air, you cannot put it back in the bottle. Allow the solution to sit for a few minutes, around 5 is perfect. Apply treatment to small sections at a time. Start at the root and work your way down with a comb. Do not apply too much keratin solution. Your hair should not be drenched in keratin, only moist with the treatment.
Next start to blow-dry your hair. Style your hair as you would usually wear it, as that is ho it will dry and tend to want to dry once the treatment is complete. Blow-dry a section at a time just as you applied the smoothing treatment.
After your hair is completely dry, flat iron your hair. It is vital to the treatment that you use a flat iron that heats up to 450 degrees. Flat iron the sections of your hair starting at the roots and working your way down to the ends. Iron each section at least three times.
Once you have completely iron your hair, you are done! Do not wash your hair for 3 days after the treatment. The smoothing treatment continues to work for some time after application. During these three days do not use headbands, Bobbie pins or anything type of hair accessory. Using hair accessory may cause you to have a distinct mark on your hair that lasts for a while.
When you are ready to wash your hair, use a keratin shampoo and conditioner that is sulfate and paraben free. This will assure that your treatment lasts longer. The results to your treatment will be less frizz, easier to manage hair, stronger hair and increased shine.
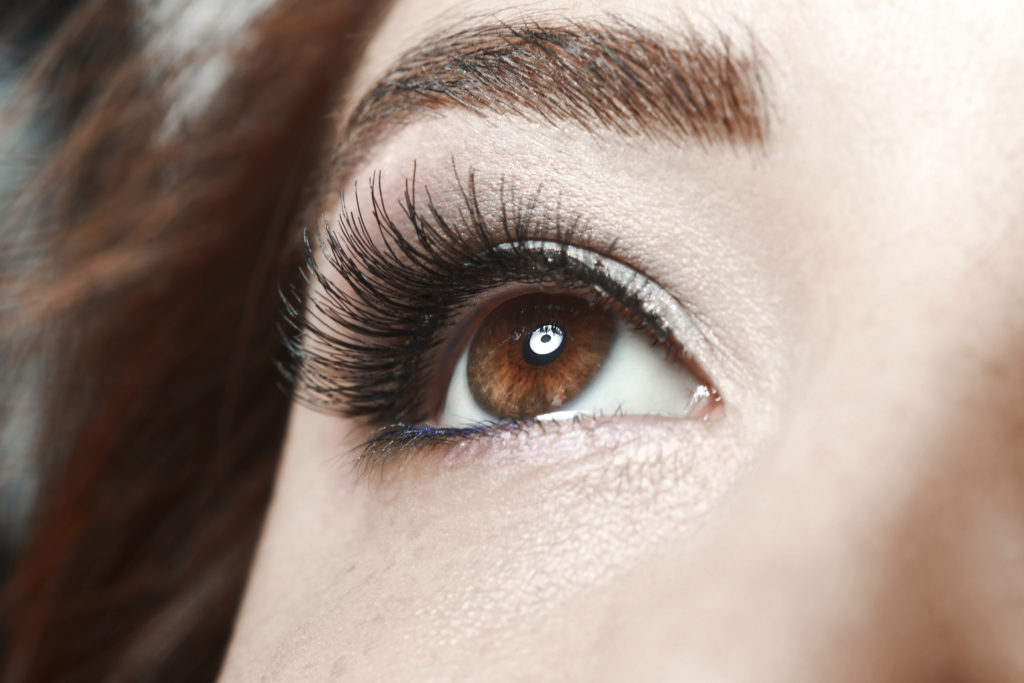
Applying mascara is not as easy as it may seem. The biggest challenge when applying mascara is keeping it clump free. Clump Free Mascara isn't so much about the formula you use, as much as how you use it! With one simple step you can make any mascara clump free mascara. Remember the idea of mascara is getting lengthy, thick and beautiful lashes not clumps!
All mascaras work great the first few times. The problem is that after a while the formula starts to thicken. Thicker formula creates clumps. To keep this from happening all you need is eye drops. When you notice your mascara starts to get clumpy and thick, add 2-3 drops of your eye drop formula into the mascara. Close the mascara and use the wand to mix the eye drops in. Voila! Fresh, clump free mascara. This is such an easy DYI way to keep your mascara fresh.
Always keep in that your mascara should be replaced at least every 3 months. This assures that you do not get any bacteria in your eyes. It also gives you the chance to try new formulas every couple months! Some of our favorite mascaras include YSL Volume Effect Faux Cils Luxurious Mascara. This is an all time favorite. If you want a faux lash look without the faux lashes, this is your go to mascara. We are also crazy about Dior It Lash. The formula for this mascara is amazing for thickening lashes. It gives you a runway look that is fabulous. For those looking to boost their lash growth, the best mascara is Grande Mascara Lash Boosting Formula. This formula not only lengthens your lashes, but it also promotes healthy lash growth.
Most of us are simply too busy in the morning to spent anything more than 5 minutes getting our skin prepped and makeup applied. As a busy mom, I am always rushing in the morning trying to get my son and myself ready and out the door in time. For this reason I have come up with a simple 5-minute skincare and makeup routine that will help you get out of the house feeling great and on time.
The first step to my morning routine is to prep my skin with a moisturizing toner. I just love to use rosewater as my morning toner. I don’t feel my skin needs a lot in the morning, just a bit of moisture to help it look radiant and feel smooth. Rose water is extremely hydrating, and yet lightweight. This is a great way to start your routine and get your skin feeling refreshed. The smell of roses is also a great pick me up.
After my toner, I like to hydrate my eyes with a good eye cream. I like very creamy formulas that help to keep my eyes looking bright and maintain that very sensitive skin under the eye hydrated. Many times the reason we get dark circles and under eye bags is because our eyes are dehydrated. It is possible for our skin to be perfectly hydrated all around, but our eyes dehydrated. For this reason we certainly cannot skip the eye cream! Find a formula that you love and that works for you and apply every morning. When applying your eye cream remember to use the tip of your finger. This allows the cream to absorb with the perfect amount of pressure from your finger.
Vitamin C is an essential part of my morning routine. It helps to keep my skin radiant and smooth. Vitamin C has so many benefits that it simply cannot be ignored. Serums tend to be more easily absorbed that creams. I like to use a vitamin C serum before applying my daily moisturizer. Serums are always applied before your moisturizer. A serum helps to prep the skin and is also absorbed easier than a cream. Apply the serum on your face and neck. Avoid the vitamin C serum around the eyes as it may cause irritation.
Once I have applied my face serum, I am ready to apply my daytime moisturizer. I like a light moisturizer for the day as it helps keep my skin feeling fresh. I feel the thicker moisturizers are perfect for night when our skin only has the skincare products on it, no makeup. However for daytime use prior to applying makeup I just love a lightweight formula that hydrates and offers ant-aging support.
The final step in my morning skincare routine is sun protection. I still know so many people that ignore the importance of using a great sunblock every day. It does not matter if you are sitting out at the beach or simply running errands. You always need to apply sunblock. A daily sunblock will guard your skin from sun exposure, pollution and truly keep your skin looking and feeling more youthful year after year.
To complete my morning routine, I simply add a bit of color here and there. I always apply blush. I simply do not leave the house without blush or mascara. Those two makeup staples along are all you truly need to look great and naturally beautiful. I also like to apply a bit of gloss and go over my brows to make sure they are polished.
All this takes a simple 5 minutes! Yes, 5 minutes is all you need to get your skin ready for the day and add a little color to your face. I believe in natural beauty, especially for day to day.
A great flat iron can make a huge difference in how your hair looks. Unfortunately many flat irons fall flat! They either do not deliver the results they promise or damage your hair. Shopping for the right flat iron can be frustrating, as you simply do not know what you are getting.
We recently tried the Theorie Saga Classic Flatiron and were truly pleased. Theorie makes what you may refer to as top of the line flat irons. They are sleek, come in an array of colors, sizes and offer the very accessories.
Lets start with the case. When you receive your Theorie Saga Classic Flatiron it will come in an elegant and protective leather case. The case is perfect as it helps to keep your iron safely stored and perfect for travel. The case comes with a stitched trim, in beautiful brown leather that truly gives the iron a bit of elegance. On the back of the case you will see all the information you need about your iron, including temperature, storage details and use.
The Theorie Saga Classic Flatiron offers you digital temperature settings up to 450 degrees. What is great about a digital reading is that you know the exact temperature of the iron, very important if you are using this iron for keratin treatments. The iron heats up in 30 seconds. This is a he plus for this iron! When you are in a hurry there is certainly no time to wait for your flat iron to heat up. The plates are titanium. Titanium irons are healthier for your hair. They do not burn or cause breakage. The titanium also helps to create a smoother result with less use.
Our favorite accessory is the velcro strap for easy storage. We all know how easily chords get tangled. The Theorie Saga Classic Flatiron comes with an attached Velcro strap that helps you keep the chord n place and tangle free always. It also comes with a heat resistant sleeve. The sleeve is perfect for when the iron is sitting on the counter or simply when you are finished and you want to store the iron.
Theorie Saga Classic Flatiron comes in a variety of colors such as black, white, purple and silver. You can also get the iron in either a 1” or 1.5” width. We have tried this iron to straighten and curl hair and the results are beautiful. You see enhanced shine, smoothness and frizz protection. A great iron for healthy and beautiful hair.